HowTo:Make your own Large Hadron Collider
“What exactly is your definition of "large"?”
Well, maybe not THAT "Large". Your backyard doesn't have a tunnel like the one the REAL LHC is in, but it will serve you well.
Let's face it, building this homemade LHC Do-It-Yourself Hadron Collider isn't easy, so feel free to try and try again if you fail at any point. But please be careful not to make a mistake whilst firing up the particle accelerator for the first time, because collisions often lead to very powerful a splosions. The hardworking men and women at CERN did a pretty good job at epically failing to explain why the universe was created. The scientists at CERN display their results to the world in a very complicated manner, thus the average person isn't able to understand the results. Because they have achieved NO progress so far, they just chuck huge formulas and large amounts of binary code at us as results.
Analysing CERN's design
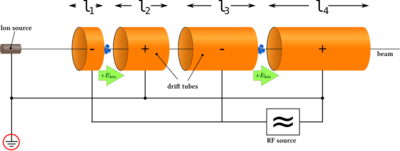
The picture on the right is a schematic of CERN's LHC. At first glance, it may look like an average schematic which depicts a working particle accelerator. However, we have noticed that there are many illogical things in this drawing.
The schematic shows us that this particle accelerator utilises multiple drift tubes instead of one long tunnel. Each drift tube has a different length. The reason why this LHC wouldn't work is that there are no signs of magnets which would stabilise the particle's trajectory while it moves in and between the drift tubes. Another thing that confused us were the three lines at the bottom-left part of the schematic (marked with a red circle). At first it seemed weird, because it was hard to understand that the geniuses at CERN would use the most pathetic source of power there is, a watch battery.
Yes, they try to power an apparatus which could revolutionise high-energy particle physics with a battery that is inferior to licking coins. The pluses and minuses on each drift tube imply that they are electrically charged, but that watch battery isn't very helpful. The RF source that is at the bottom of the schematic, is actually the same thing as the "Ion source" situated on the left end of the LHC. We have come to the conclusion that CERN put it there to make the schematic look more sciencey.
Step 1: Acquiring the required parts
The tunnel
Well, the basic element of any particle accelerator is well, the tunnel through which the particles will travel. The tunnel itself MUST be perfectly cylindrical. No imperfections within the tunnel should be tolerated. The making of the tunnel should be relatively easy. The tunnel can be made out of different materials, the choice of the material is down to personal taste, as long as a perfectly smooth interior is guaranteed. (We don't want the end of the world to come early now, do we?)
The propulsion system
Naturally, the particles need to be propelled and there is no better propulsion system than a burning squeaky-voiced midget.
The fire here works as a stimulant (a fuel if you will) that causes pain. The midget's nervous system responds to the searing pain with screaming. The midget's vocal cords produce high frequency, high energy sound waves which transfer their entire energy to the particle that needs to be propelled. The compact size of the midget allows versatility. The midget propulsion system needs to remain absolutely stationary to minimise energy loss.
The magnets
Magnets have been used since the beginning of time to ease everyday activities, and stabilising a LHC DIYHC is no exception.
To stabilise the propelled particle's path, we are going to need magnets. Lots of them. At first, you may say: "Sure, I'll just use those magnets on the fridge.". But don't use magnetite, that stuff is for wimps. Electromagnets are a lot more powerful than regular ones and 12-16 of them should get the job done. So, unless you have a small magnet mine, stick with electromagnets.
The magnets need sufficient cooling, having in mind their high power. That can be done in many ways:
1. Use hidrogen hydroxyl.
2. Put it in a refrigerator.
3. Use liquid nitrogen. (That shouldn't be a very big problem, just call the fine folks at NASA. I'm sure they have gallons of liquid nitrogen just lying around.)
Step 2: Assembling the particle accelerator
This step is the easiest one to complete.
- Place the tunnel in a horizontal position.
- Secure the magnets on the tunnel.
- Encase the magnets. (Make sure you leave some space to pour the cooling agent in.)
- Secure the propulsion system unit on one side of the tunnel.
Please click on this troubleshooting guide should you encounter any problems with this step.
Step 3: Starting up the Do-It-Yourself Hadron Collider
To start this mean machine, simply apply fire to the midget propulsion system.
The propelled particle will travel through the tunnel at the speed of light, accomplishing what CERN should have done, but at a fraction of the time.
Things you should watch out for
- Make sure the tunnel is VERY smooth, OR ELSE.
- If you have any prosthetic limbs or anything inside your body that can be attracted by a magnet, please operate the particle accelerator from a distance to prevent a painful mutilation.
- Unless you want to create a new beginning of time, please be extra cautious with the accelerator's first run.
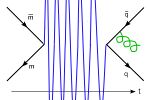
- This contraption can't propel antimatter, because it's made entirely out of anti-antimatter. Here's why:
where n>9000.
See also
| Featured version: 6 September 2012 | |
| This article has been featured on the main page. — You can vote for or nominate your favourite articles at Uncyclopedia:VFH. | |


