HowTo:Spay or neuter your own pet

|
HowTo This article is part of Uncyclopedia's HowTo series. See more HowTos |
“Remember folks, help control the pet population by having your pets spayed or neutered.”
Spaying or neutering your cat/dog is one of the best things you as a pet owner can do to control the excess pet population. Although very humanitarian, however, it is also very expensive and requires that you drive your pet to a trained veterinarian. For those of us who are low on time and money, the quickest and simplest way to spay/neuter your pet is to turn it into a "do-it-yourself" project. If given the right instructions, ANYONE can spay or neuter their own cat or dog!
What do "spay" and "neuter" mean?
Spaying is like a historectomy, but more barbaric. An incision is made just below the lateral supinatory line roughly two inches distally. Then a trained animal professional cuts out the baby making parts, and sews 'er back up. The ovaries and 'felopian whatevers' are removed along with some other garbage. It's not exactly rocket science.
Neutering, on the other hand, is done to a male dog or cat. An incision is made on the scrotum and the testicles are removed with an item similar to a melon scraper. The scrotum is then stitched up and then your pet feels really depressed for the next several weeks.
Let's get going!
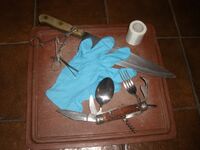
Alright grab your pet and your latex gloves, it's time to get cutting!
What You'll Need
- Some type of cutting device. A scalpel would be ideal, but can be substituted with a kitchen blade or Exact-o Knife.
- Chloroform, or anything else that will make your pet really sleepy.
- Elevated surface to work on, such as the kitchen table for your convenience.
- Latex gloves are a must. Rabies is not a fun disease!
- Melon scraper, to remove the testicles. (Only applicable for male animals.)
- Sanatized pair of scizzors, to prevent infection!
- A needle and thread.
The First Few Steps
Okay, so you've gathered all of your materials. Now it's time to start the procedure! Remember, you're no Ph.D., so try and keep a cool head when following the intructions given.
The first step is to prep your operating area. Make sure you're ready to accept the high volume of blood that may or may not spill out of your pet's abdomen. Blood is 'icky', gross!
After your area is prepped, you're going to want to sterilize your equipment. You can use rubbing alcohol or Jack Daniel's whiskey, depending on whether you want the bacteria to die or get drunk and pass out.
Make sure all your equipment is on a tray of some kind for easy access. Plus, the tray makes you look like you know what you're doing.
Now it's time for your homemade anesthesia. Use a rag covered in chloroform and hold it over your pet's nose until he/she's fast asleep. You can also substitute chloroform for ether, gasoline, or a big hammer.
Finally, you're going to want to flip your pet so it's laying on its back. It's easier to operate on your pet's underside when you can see it!
Neutering 101
So you're ready to remove your pet's testicles (if your pet has no testicles, then move on to Spaying 101).
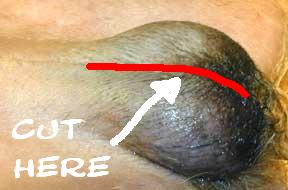
First you are going to grab your cutting device and begin the incision right on the scrotum, just as this picture displays:
You should now be able to see the testicles (if you cannot, then move on to Spaying 101). Now, with your melon scraper, slowly dig underneath the testicles and then scoop them out. You may encounter lots of tubes and blood vessels connecting to the testes, but they won't be needed now that your pet has no testes. Tie off the vas deferens (don't want to get blood everywhere, do you?), then cut to remove the testicles.
Now that the testes are removed you can sew the scrotum back up and your dog should be good as new! As for the removed testicles, you can either throw them away or keep them in a jar to scare people!
Spaying 101
So you're ready to remove your pet's ovaries (if your pet has no ovaries, go back to Neutering 101). This procedure is a tad more complicated than neutering, but the basic principle of removing the baby making parts still remains.
You're going to want to cut about where the uterus would be on your pet. You could probably guess and get it right to within a few inches. If you're wrong, it's no big deal.
After you've opened up your pet, you need to remove the ovaries. That's the whole point of the procedure! Shove your hand into the abdomen of your pet and feel around for the different parts. Take your scissors, and, with your other hand, cut just below where you feel a lumpy ball on either side of the uterus. This should be the ovary. Do the same thing for the ovary on the other side.
Now that that's done, feel your pet's heart to make sure she's still alive. If she is, then you are doing A-O.K.! Then, you're going to use your needle and thread to sew her back up. Hooray!
Clean-up/Disposal
If everything didn't go as planned (or maybe it did), simply place unwanted contents (ie:pet) into bag and place into dumpster. You also can do this to a human just don't use your real name say your a M.D. and charge them $22.000 Thousand dollars.


